
The advent of indoor plumbing ushered in waterproofing challenges for bathroom and shower areas. Since these areas are subject to daily repeated moisture, the appropriate waterproofing must be determined prior to embarking on a wet area project. Making this determination requires knowledge regarding various waterproofing methods. Three of today’s most common waterproofing methods for indoor wet areas include the use of cementitious, liquid applied and sheet applied waterproofing products. Although all these techniques can provide waterproof barriers when properly installed, each application is different from the others in several ways. In this article, we will explore these three techniques to provide some insight and help establish which to use for your next wet-area application.
New updates for waterproofing standards now include an option to specify waterproofing in two ways. The existing ANSI standard is A118.10, which does not differentiate between liquid applied or sheet applied products. Starting in 2024, specifiers will have the option to specify A118.10 L (liquid) or A118.10 S (sheet) membranes. There is also an option to add a ‘v’ rating for products that produce a permeance rating less than 0.5 perms when installed per manufacturer’s instructions. These products provide waterproofing for steam showers, where extra performance is required.
Cementitious
Cementitious waterproofing involves applying a thin layer of waterproof cement mixture over areas that will be exposed to moisture. It is frequently used in exterior applications, although it can be performed in interior applications as well, using a long-handled brush and rolling the cement mixture over the solid backing. Alternatively, cement waterproofing can be applied with a flat trowel.
Pros -- The products for this type of waterproofing are readily available and cost-effective, which provides convenience for installers. The products involved are also easy to mix and apply with tools already in a tile installer’s vehicle, which is another reason for its popularity. Most specialized cement-based waterproofing mixtures include an acrylic additive to enhance the bond and improve the performance for applications that require it, such as walls.
Cons - There are some less-than-ideal aspects to consider before embarking on this method. If there are any cracks or potential joints in the substrate, the cementitious layer will not provide waterproofing protection to those areas, so caution must be used to seal any imperfections prior to installation. Once the cement layer has dried, there is little to no flexibility provided. Any cracks that develop in the substrate or the cementitious coating will compromise the waterproofing. It is also difficult to determine the finished thickness of the waterproofing layer, since these products are opaque. Finally, any unused portion of the mixture must be disposed of and cannot be saved for future projects.
Liquid Applied
Liquid-applied waterproofing requires the use of a liquid-based mixture and rolling or brushing it onto applicable areas in interior and exterior applications. There are two types of liquid mixtures – elastomeric and acrylic.
Pros -- This is a cost-effective method and materials are widely and readily available. Elastomeric-based coatings provide more flexibility, whereas acrylic-based coatings are used in areas where increased strength is necessary. Application for this type of waterproofing is quick, in general.
Cons -- Beware of inconsistencies in thickness, as this could increase drying time after application; thus, the layers must be applied evenly for this method to be effective. Any bubbles or application over a jagged/sharp protrusion can compromise the waterproofing. There is also a minimum thickness requirement for most liquid-applied membranes that must be observed during application for the waterproofing layer to perform as designed. These requirements are difficult to meet without using a wet film thickness gauge, a tool not found in most tile installers toolboxes. Furthermore, since the liquid applied membranes have a limited shelf life once mixed, any unused portion of the mixture must be disposed of after installation is complete. Liquid waterproofing is also typically not freeze/thaw stable, so care must be taken to keep it above freezing temperatures.
Sheet Applied
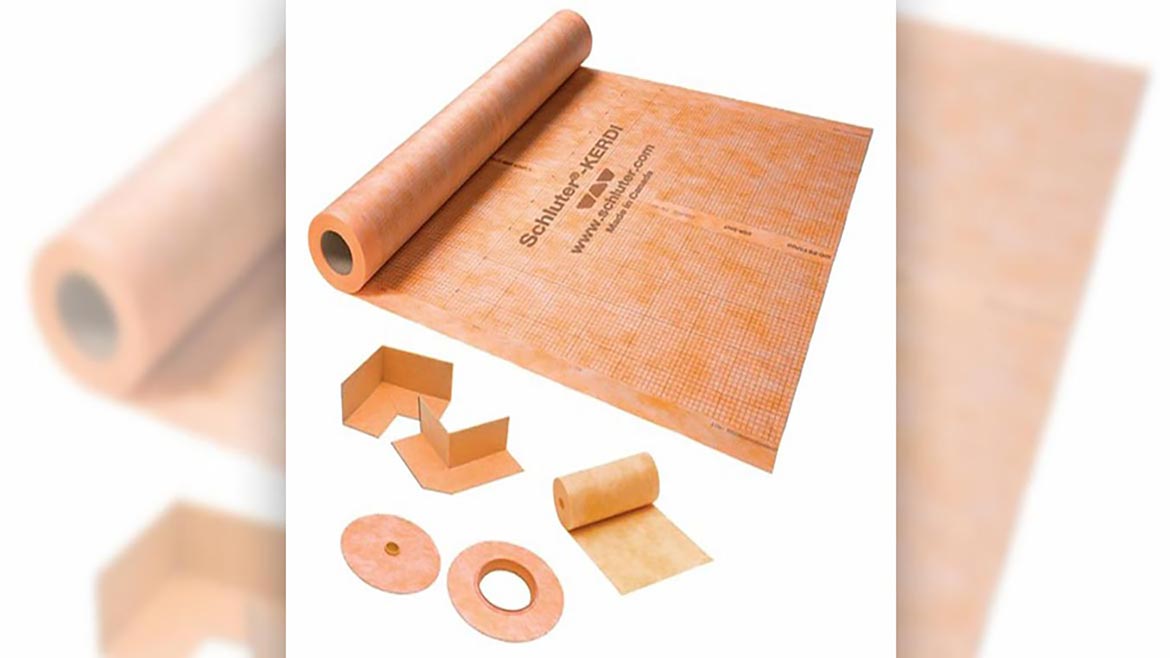
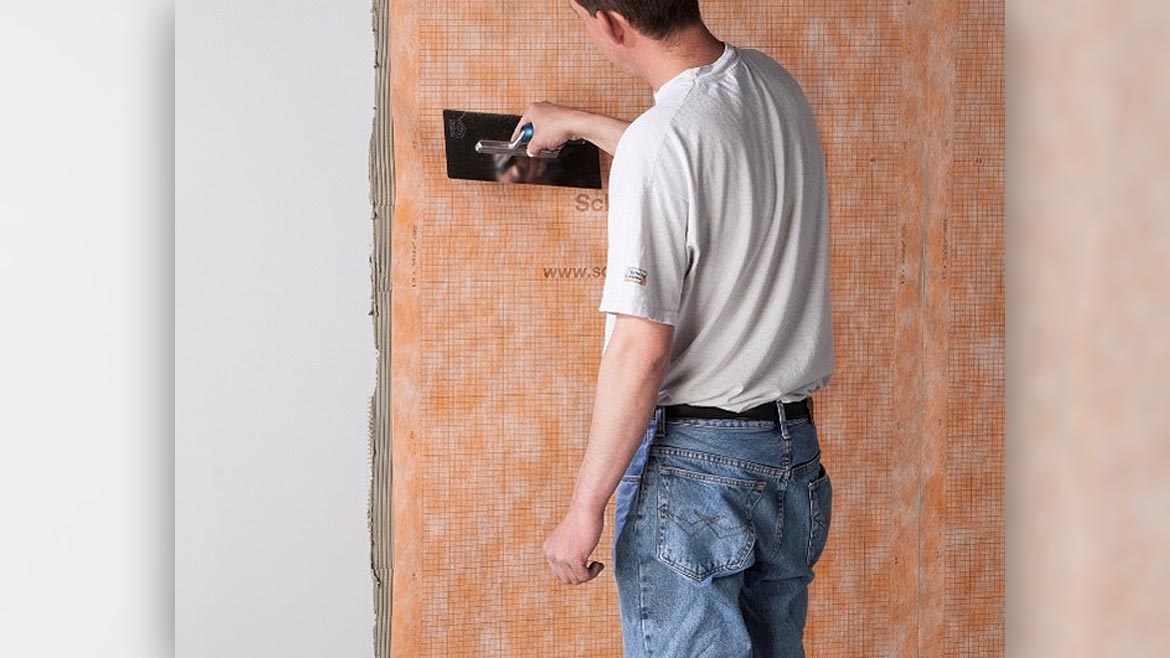
The final waterproofing method we’ll discuss here is sheet applied. Sheets are available in band form for seams and connections, full membrane rolls for walls and floors, and corner pieces for seams on inside and outside corners. The membranes and bands are available to purchase in different-sized rolls that fit the needs of the installation and can be cut to the appropriate size, as needed. Sheets or bands are applied with a thin-set mortar adhesive. The consistency of the mortar depends on the application, along with the substrate or solid backing (i.e., cement, drywall, foam board). Trowels with appropriately sized notches are available for such applications and provide convenience, minimizing any guesswork. Typically, a 2-inch overlap is necessary at all connections for the membrane to function as constructed and to provide a leak-proof layer. The full membrane sheets can be applied over surrounding walls, and any expected penetrations can be cut-out as necessary while dry fitting the membrane over the substrate or solid backing. Any fixtures that will penetrate through the application can be treated with the appropriate sealant to provide a waterproof barrier in conjunction with the membrane. Specialized collars are also available to address waterproofing for piping protrusions, such as shower heads and mixing valves.
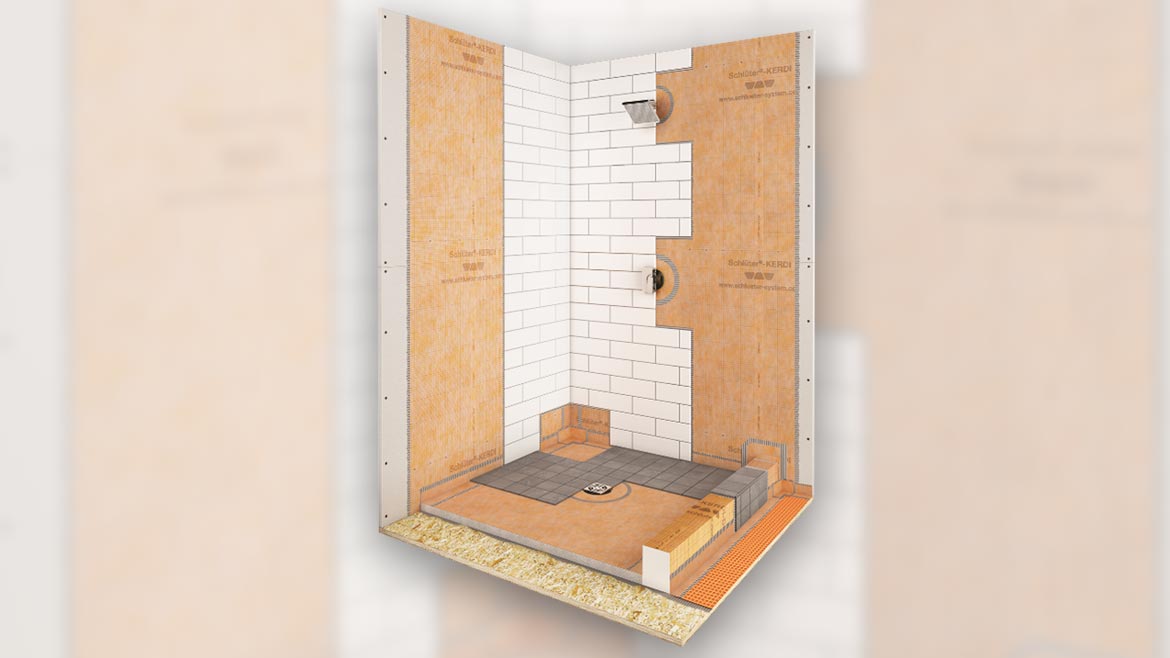
Pros -- Like the previous two methods discussed, sheet waterproofing membranes are generally easy to find in stores, and they are also cost-effective and can be purchased in advance, which is an advantage over the aforementioned products. Also, unlike the other two options, sheet applied membrane leftovers can be saved for future projects. Sheet membranes are UV and weather resistant, so storage is not an issue. The sheets are also the same thickness throughout, so application is quick, when used in conjunction with the correct mortar and trowel. A trowel that contains notches that are 1/8- x 1/8-inch in size provides accurate mortar thickness when bonding the membrane to the appropriate approved solid backing. There is also a sense of assurance of complete waterproofing when the 2-inch overlap is achieved without the worry of any bubbles or imperfections within the membrane. In addition, tile can be installed directly over the sheet membranes immediately after membrane application without requiring dry time, as opposed to the other two options.
Cons – Multiple layers of sheet waterproofing can be challenging for installing very thin tiles, such as mosaics. Also, sheet membranes do require some practice to install, especially when it comes to meticulous work around a drain. However, manufacturers frequently provide training on how to use their system efficiently and effectively.
Conclusion
Many types of waterproofing exist for wet area applications, but each type has its pros and cons. By understanding the nuances of installing each, the correct selection will ensure many years of stress-free waterproofing in interior wet areas. Newly created designations in the existing ANSI A118.10 standard now allow specifiers to indicate if they want liquid-applied (L) or sheet-applied (S) waterproofing installed in wet areas.


